Sunday, August 7, 2011

Caught a Bug


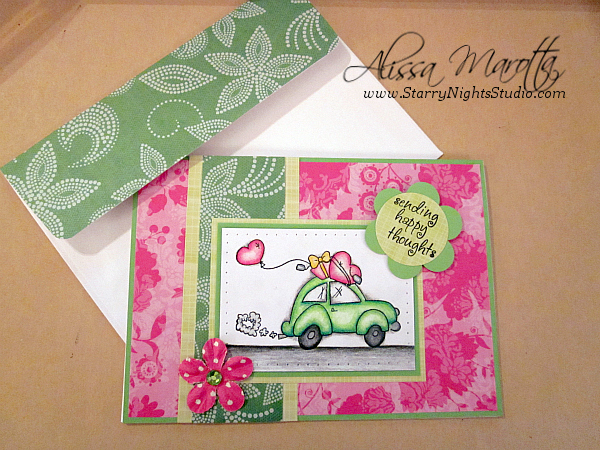
Finally got some time to make some new cards this weekend. I spent the last month or so making over 75 cards for people so the last thing I've wanted to do lately is make some more, but I finally got the urge to do so this weekend, and what better to start with than my favorite Caught a Bug stamp from Unity.

I colored my bug with my trusty Prismacolored pencils and used some foam tape to adhere him. For whatever reason I tend to go with stripes when I use this stamp and I have no idea why, but the paper is from My Mind's Eye.

Related Hub:

Thanks for stopping by!

Tuesday, July 5, 2011

I Like You a Latte


My partner-in-crime, Doreen, celebrated her birthday on Friday, so I decided to make her a coffee-themed card because there is nothing in the world she likes better. The coffee cup rubber stamp is a stamp I got from my good buddy Lynn that I colored with Prismas. The DP is all from My Mind's Eye. I stuck with a mostly brown and white combo before adding a touch of the red to pick up the hearts in the coffee cup. The sentiment and image were adhered with foam tape for some dimension.

Thanks for stopping by!

Thursday, June 23, 2011

Pocket Full of Daisies


I had a lot of fun with this card because I got to combine painting and paper crafting. First I did a very wet yellow background on some watercolor paper and then added some blades of grass with different shades of green. Instead of painting the flowers, I hand-punched them all and added rhinestone centers. Because the image was so simple, I was able to go with a really crazy background from K&Co to pull it together. The image and flower sentiment are both adhered with foam tape.

Thanks for stopping by!

Wednesday, June 8, 2011

Super Star Kid


I tend to not make many boy-themed birthday cards, but I've had this digi for a long time now, and finally decided to color it. I did so with Prismas and chalks, and then found some paper in my stash that coordinated nicely. It needed a little more, so I also found a chipboard "Super Star" embellie to add with some foam tape before deciding to pierce some holes in the design and call it a day.


The digi is from Mo's Digital Pencil and the embellie is from K&Co.

Thanks for stopping by!

Wednesday, May 25, 2011

Well Wishes Tree


Recently one of my closest friends, Deb got her Ph.D. and when my colleagues and I tried to figure out what to buy her for a gift, we quickly realized that with Deb being a a no-frills kind of gal, the best gift we can give her was one that came from the heart. Somehow between the four of us, we came up with a Well Wishes tree. It was purely a concept and I really didn't know how this was going to turn out, but we were all pretty happy with the result.

To make this tree, I went to the floral section at Michaels and picked out two large branches. Then I got a large terra cotta pot and placed a large foam ball inside of it, stuck the branches in, and filled the rest of the area with some moss (which I'm still finding in my kitchen). After that it was just a question of how I was going to make the little cards for us all to write sentiments on. I decided to cut 3x4" pieces of scrapbook paper and score them in the center to make little cards so the messages were a little more private. I corner-punched the ends for a little more detail, punched a whole in the top left corner, added some rubbon, and voila! The Well Wishes tree was a big hit.

Thanks for stopping by!


Tuesday, May 17, 2011

It's Owl Good


I love my new little owl stamp. I especially love how it works with the "It's Owl Good" stamp I had laying around for years that I never thought I'd be able to use! My little owl is colored with Prismas in aqua and lime to pick up on the colors in my DCWV designer paper. I used my Martha Stewart scallop punch for the border, and my eyelet Nestabilities for the frame before adding the aqua rhinestones for the finishing touch.

Thanks for stopping by!
 

Sunday, May 15, 2011

Post-it Note Holders

Quite a busy weekend all ready but definitely very productive! Got some stuff done in the house (which included a trip to Lowe's to pick up 16 bags of mulch - yeah, that was fun), and did some crafting which included getting my order of 10 Post-it note holders out the door, woo hoo!

The request itself came from my my pink daisy holder. The customer wanted 8 holders to be the same or similar to this one, and then an additional 2 to be more masculine. I like to use cardstock when I'm creating these holders because the paper itself is a little more sturdy so I went with DCWV's "A Pocket Full of Posies" collection. It really accents the daisy embellishments, and some of the paper even has a little glitter and texture built in.

Here's the finished product.The hardest part was trying to figure out how to send 10 all at once - too big for bubble mailers, too small for some of the priority boxes. I ended up wrapping them all in tissue paper and adding a little cushion inside. :)


Thanks for stopping by!
 

Tuesday, May 10, 2011

Pretty Little Flowers


Another non-stamped card for me, woo hoo! Unfortunately, it didn't take me any less time because I struggled forever with the placement of the flowers - the OCD came out with a vengeance on this one! The good thing is the paper itself was so pretty, it didn't seem to matter. Both the image and the sentiment were adhered with foam tape for dimension, although I'm not sure you can tell if you're looking at it dead on. I didn't intentionally mean for it to come out that way, but now that its done, I kinda like the 3-D look it created. The flowers were all hand-punched and attached with glue dots, although, like I said, it wasn't as easy as it looks. I added the small pearls in the center too because they needed a little more and voila! I'm ultimately pleased with the way it came out and have already received a custom order for another one (yay!), so I might be trying to tackle this one again. I'm curious to see if changing the paper makes the difference. We shall see...

Thanks for stopping by!


Friday, April 22, 2011

Sending Happy Thoughts

Big, busy weekend for me. I have orders for 30 note cards and 3 greeting cards - all by Monday, and Sunday is Easter. Just a little stressed so I'm totally procrastinating by posting my new card. :)

The stamp is from Whipper Snapper Stamps and it's called "Luvbug". If I had all the money in the world, I would buy every single Whipper Snapper stamp available. I LOVE them all. The paper is some DCWV I had in my scrap box, and the flower I punched out of fabric and added a rhinestone middle. The sentiment is a clear acrylic stamp from a kit I got from my stamping buddy, Shelly

Okay, enough procrastinating. Off to work! 

Thanks for all of the nice e-mails and guestbook entries I have received about Lisa. I was told they made her day. :)

Thanks for stopping by!
 

Sunday, April 17, 2011

So Happy Together

I cannot believe the weekend is already over (sigh). I got 3 of my custom's done though so I'm feeling productive at least. I don't do it enough, but thank you all for your special requests and very kind e-mails. They make my day!!!!! 


Okay, on to the card. I enjoyed making this new one simply because I don't tend to make many masculine cards -- not that this is the most masculine card I've ever made, but hey, it's a start. I hesitated to put it in my shop at all just based on the fact that this card was inspired by my father's very odd relationship with my parent's 3-pound teacup Yorkie... that's all I'm going to say about that. :)


I love my little paper fasteners from Quickutz. They add just a little something that's needed. The image is again from Mo's, and it's colored with Primas. It is adhered with foam tape for added dimension. I struggled with the sentiment until I realized "So happy together" was just perfect.

Thanks for stopping by!

Tuesday, April 12, 2011

Girls Just Wanna Have Fun


Spending the afternoon working on catching up on some orders but I wanted to quickly post this new card featuring a new digi from Mo's. She seems to be introducing new digis almost daily now and one keeps getting better than the next!  I used K&Company paper for the layering, and Primas for the coloring. She's propped up with some foam tape for added dimension.
Back to work!

Thanks for stopping by!


Wednesday, April 6, 2011

Grilling Dad


Love my Big Guy Grilling stamp from Mo's. I noticed afterwards that I always tend to color him with the blue/brown combo so next time, I'm definitely mixing it up. He's colored with Prismas and chalks, although it's really starting to bug me that the distressed edges aren't showing up so well on my camera. I have to play with that setting... anyways, the paper is from My Mind's Eye, and the fasteners are from Quickutz. If you haven't checked them out already, you need to go to Cut @ Home. Holy cow I could not get over the deals. And the shipping is sooooo reasonable, too.

Off to blog hop. Thanks for stopping by!


Monday, April 4, 2011

Mommy to Be


So I made this card with my sister-in-law in mind and then remembered, after the card was made, that she absolutely HATES pink. Guess this is going up in my shop now. Oh well, lol.

I really like the pink and green combo I got by using some of my My Mind's Eye papers. I was a little worried about adding the chocolate brown but ended up getting a little bit of a contemporary look going on so I'm good with it. I used my Prismas to color the image and then distressed the edges with a little sage. The flowers were created using my 300 pound original Sizzix. :)

Weekend's over, back to work. Ugh!

Thanks for stopping by!
 

Saturday, April 2, 2011

Dance to Your Own Music


UConn men are playing tonight in their Final Four game so I'm making this post really quick before my company gets here. I just love the Mummu collection at Mo's Digital Pencil. She is such a joy to color! The DP is from K&Company (still in love with it). I've really gotten into the layered look this year - I think it's due to the fact that I have trouble saying "no" to paper, so it's easier to just keep going with it. I recently bought an acrylic stamp set of sentiments from Inkadinkado which really came in handy for this one. The set is called "Thoughts for the Day."


Hope everyone's having a great weekend!

Thanks for stopping by!
 

Sunday, March 13, 2011

Pouty Pants


I created this card with my co-worker, Marion's, granddaughter in mind. She has the most gorgeous red hair and the cutest Cabbage Patch doll cheeks, so I knew the first time I ever used this stamp by Mo, I would be using Sally as my inspiration. The paper is from K&Company and DCWV. I tried to find papers that kinda, sorta match "Sally's" outfit, without washing her out completely. Not thrilled with the end result but it will have to do!

Thanks for stopping by!
 

Sunday, March 6, 2011

Happy Retirement

Got a custom order request to make a Happy Retirement card and then struggled a bit with it. I don't make too many of them, so I had to figure out the theme before quickly realizing that retirement cards seem to always be synonymous with the beach and relaxing... so I chose both. The paper I've had in my stash for years - I think it was a travel pack, and then image was a stamp from Rubbernecker. The sentiment was PC-generated.

Thanks for stopping by!

Saturday, February 19, 2011

Precious Memories

Just realized I never posted a pic of my "Precious Memories" card. Isn't the image just adorable? It's called "Birdie" and it's from Phindy's Place. This is the first image from Phindy's that I've used and I'm already hooked! I colored the image with my Prismas and chalks and then sifted through my new KandCompany Classic K McKenzie Paper Pad to find just the right colors that would match her cute little outfit. I arranged four of the papers until I was satisfied and then added the scalloped border before realizing I didn't like the way it looked (oh well). She, along with the paper flower, is attached with foam tape. Off to make some note cards!

Thanks for stopping by!

Tuesday, February 15, 2011

Love You to Pieces

Have I mentioned how much I love my new paper stack from K&Co? Because I love it so much I can't stand it. For the image, I went with one of my favs from Mo's Digital Pencil and colored her with my Prismas before matting the image on one of my Nesties. I off-set some polka-dot paper I had in my stash with a similar background just to mix it up a little bit before adhering it all to the floral DP. Then I adhered the paper flowers with foam tape and then placed two chocolate pearls on the corners. Voila! Nice and easy card!

Thanks for stopping by!